
I was minding my own business, only like 12 tabs open on my browser and realized I hadn’t posted and side body was basically done. Then, in classic me fashion realized I forgot a crucial part of the pieces. The FASTENERS.
So…I was almost screwed….no I’m not going to stop using that joke through this article, it was literally written for me to do exactly that.
Fasteners#
I did a little looking, and the resounding answer was an addon. Due to my day job, and the fact that Jenkins exists…I was hesitant. Add ons add one extra point of failure, add ons make updates hard, and add ons add what we will generously call “undocumented features” or “spicy interactions”.
I did it anyway. Because apparently, I hate myself.
First thing, I went to the sketch, cause that’s how I’ve trained myself. No fasteners. Ok…cool. It only works in the Part Designer. Then it looked simple.
- Click Part
- Click the fastener tool
- Pick from the literal eleventy billion fastener options (there are more in the menus!! OMG)
- Click insert
- Move fastene….wait…where is the fastener?
Clicked and clicked and clicked and couldn’t see anything. So obviously I dear reader had messed something up. Sure there’s a whole list of pieces in your design bench, but WHY USE THAT?! HUNT AND SEEK THIS IS THE WAY!
Couldn’t find it…so I did the obvious thing…added another fastener…..13 times.
It wasn’t until I zoomed out and saw a random nut sitting on top of Terminal Dawn that I realized what had happened. And not until I clicked that and the list updated that I remembered this was a solved problem. So I mashed CTRL+Z a lot…ended up removing parts I needed.
Ended up closing the sketch and reopening it and then hunted down all the fasteners, removed them, and then added the one I wanted.
Problem 1#
Me: clicks surface Fastener: appears somewhere completely different FreeCAD: “Here’s the fastener exactly where you clicked” Me: “No…I cliked THAT surface” FreeCAD: “I placed it where you clicked. ¯\(ツ)/¯” Me: ….. FreeCAD: “U mad bro?”
Problem 2#
These items look suspiciously like addons…not subtractions. Cause like..they are. It felt like I ordered pizza and only got a box with cheese and the toppings without the crust. I can see WHY it would be that way…but it doesn’t help me.
The addon puts the INSERT in but doesn’t create a hole FOR the insert. If I attempted to make it one, I would have weird artifacts in the part which would lead to spaghetti prints later. Technically correct (the best kind), but utterly useless for my needs.
Solution#
I went full cavement and did it manually:
- Create 4.7mm diameter holes, 6.2mm deep
- Used Copy/Array tool to duplicate
- Added chamfers, because hey why not?
I checked the sizing with the fasteners AFTER the fact…they fit.
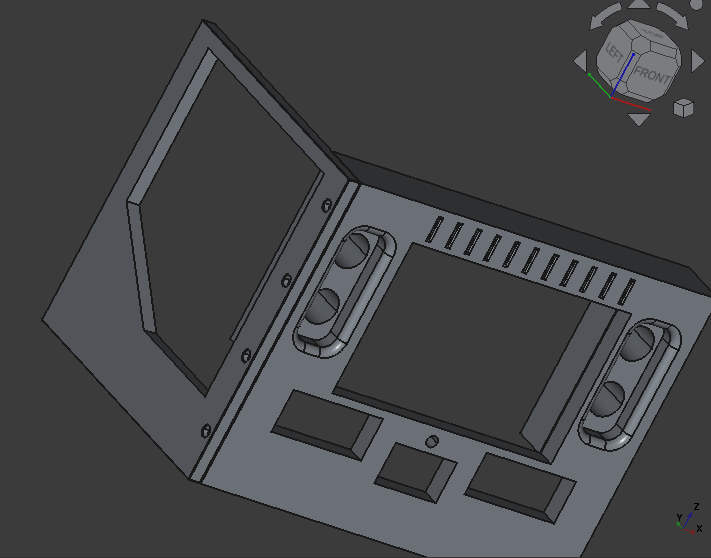
Datum Points#
Now I had a hole for the heat set inserts in the side of my front panel. I have nothing in the side panel itself which I am going to counter sink the bolts in. Cool. Didn’t write down where I put the items on the front panel. Also cool.
Enter Datum Points. These likely have a different use, but I am using them as reference points in my design. I centered them in the holes I had already created, and they were VISIBLE on the other part when I went to add my 8..yes 8 pockets. Better than eyeballing it.
Why 8 pockets? Well..I need one for the bolt shaft, and another for the bolt head. If I just did one, I would have a straight through hole that wouldn’t hold the side on.
Started with the intent of adding 4 fasteners, ended with adding 12 holes. It works (digitally so far)
Doors?#
The design is boxy, but I want to have 3 solar panels on this thing. The solution I came up with that also solves some of my airflow/heat issues….side panels that open. Instead of the whole wall, I just want parts to move, and since it was boxy, I went non boxy. Like half trapezoidal…it’s essentially a pentagon cause 5 sides, but not in the shape you just thought of. See pictures for reference.
Alignment#
I almost forgot about this as it was a little tic-tac-sized footnote. I had to align my side to my front or the holes would be wrong anyway. This is how.
- Select objects in part design bench
- Hit edit
- Choose alignment
- Pick your reference points (I used edges) … no I don’t know what more edges does
- To remove a point…right click and use the context menu
- Right-click, select Align.
What’s next?#
Adding space for the hinge, mirroring the object to the other side and maybe getting a quick back piece done. The next spicy pieces after that will be the base, and top. I’m going to be adding a modular plugin system that the side panel openings will allow.
A Quick Disclaimer#
This reads like I’m mad at the Fastener Add-on or hate it. I don’t. It’s amazing!! My caveman brain however wasn’t prepared for all of the options and ran face first into analysis paralysis. The Add-on is stable, it does it’s job incredibly well, and if you’re working with fasteners…USE IT!
I’m just too stubborn to read the documentation first.